Thursday 15 December 2011

I will make this for my mum

Sometimes it is good to have a flick through supermarket magazines. I refuse to pay for them but I will happily steal recipes. Luckily Charlie is the same and with his uber-phone stealing of recipes is almost too easy. I stick to the old fashioned methods (i.e. try to remember and write it down the moment there is some paper around you!) but sometimes being modern can be useful.

This is a not so modern pie - it has things that you all know and if you don't like any of the ingredients alreay this recipe won't covert you. It is as much about leek as it is about stilton. And when you get cooking make sure you do bake it for 40 minutes. Trust the pastry and don't get paranoid after 20 minutes when it looks vaguely ready. If you want a crispy bottom let it wait. 


Leek and Stilton pie

about 500g potatoes
1 onion, chopped
3 leeks, chopped
200g stilton
~350g puff pastry
butter
salt, papper and thyme
1 egg yolk or some milk for glazing

 
Preheat the over to 200C.

Start with making mash potatoes. Chop the potatoes into cubes and boil until soft. When they are ready drain them add a bit of salt and, if you wish, milk. Mash them until smooth and set aside.

Put a knob of butter with a touch of oil in a frying pan and add the onion. Fry it on medium heat for a couple of minutes and add leeks. Fry for further 10 minutes until leeks become soft. Add thyme to taste and season with salt and pepper.

Roll out the pastry into a greased pie dish. Make sure you have some pastry hanging around the edges, so you can make the pie look cool by covering it with the excess pastry. Spoon the mash on the bottom of your pie dish (onto the pastry!). Crumble the stilton on the mash and then add the cooked leek on top of the cheese. Fold the remaining pastry on top and glaze with an egg yolk or some milk.
Bake for about 40 minutes until the pie is all crispy and golden brown. The cheese will melt beautifully and it will all go really well with a glass of red wine and some simple salad. Enjoy!

(plus it makes great lunch next day as it can also be eaten cold)

Thursday 24 November 2011

Children, don't drink too much coffee and ... mocha cupcakes

I have had a cake decorating set for a while but never felt brave enough to use it. I have also started work recently and very quickly got addicted to coffee (which I am now trying to cut down on), so one of the first baking cravings I've had since starting work was ... coffee flavour cupcakes. My favourite Hummingbird bakery has a recipe for some but this time I opted for a general internet search. I made them, shared them with lots of people at work who all drink way too much coffee and then ... lost the recipe. Below is my attempt at remembering it, so if it is not perfect I do apologise. I think it should be though - it sounds about right. They are very nice - I don't really like muffin like baking, but these ones I could happily have with my co... tea. Tea is what I meant to say.

Mocha Cupcakes

For the cupcakes:
2 cups flour
1/3 cup unsweetened cocoa powder
1 tsp baking powder
1 tsp baking soda
1/2 tsp salt
3/4 cup milk
1/2 cup freshly brewed espresso
1 tsp vanilla extract
150g unsalted butter, room temperature
3/4 cup granulated sugar
3/4 cup light brown sugar
1 egg
1 egg yolk

For the frosting:
150g unsalted butter, room temperature
3 cups confectioner’s sugar
1 tsp vanilla extract
1 double shot freshly brewed espresso

Preheat the oven to 180C. Grease about 18 cupcake cases.
Combine flour, cocoa, baking powder and salt in a bowl, sifting them through. In a separate bowl beat the butter with both sugars for about 5 minues until light and fluffy. Add egg and egg yolk one at a time into the butter mixture each time whisking well. Once well mixed add milk and espresso to the bowl and stir until the ingredients are well combined. Add the flour mixture into the other one mixing well but not too thoroughly - neither cupcakes nor muffins require that much attention when being stirred. Scoop the mix into the cupcake cases (they should be 2/3 full, but if your oven is as overly keen as mine you can fill fill them until half full, so they don't rise too much). Bake for about 18-20 minutes or until a stick inserted into them comes out clean.

As they are baking make the frosting.
Make sure your double shot of espresso is cool before you start. Beat the butter and sugar together again until light and fluffy. Add vanilla essence and espresso and mix well. Voila! Frosting ready - I was surprised how easy it was.

Before you can frost the cupcakes you need to let them cool down. Otherwise the frosting will melt on them and it won't look nice. Trust me - I was so excited about my cupcakes that the first two were ruined like that. So, once they are cooler frost them as you wish - using a fancy frosting kit or just a pallette knife. Either way - they will be tasty!
 Enjoy!
(also, my cake decorating set is messy and so much fun!)

Saturday 12 November 2011

Leek risotto

Autumn is the season of leeks - plenty of them arrive with my veg box. You may not think them a particularly exciting vegetable and if so ... you are wrong. I didn't use to think they were anything special and I only really liked them in one salad that y mum makes every now and again. And even then I was not the greatest fan. But then there was no getting away from them as they kept coming in the boxes in the autumn, which made them similar to cabbage. 

Cabbage does give you some room for culinary manoeuvre but will never compare to leeks, which when cooked become creamy and almost nutty in taste - perfect to warm you up and very very exciting in risottos. So... of you go - get yourself some leeks and make a Leek Risotto!

 
Leek Risotto

You will need:
200g risotto rice (arborio or carnaroli)
500 ml vegetable stock
1/2 glass of white wine
1 small onion, chopped into cubes (I used a red one just for a change)
1 leek, sliced into semi circles
olive oil
a knob of cold butter
salt, pepper
 
In a non-stick pan (or any other sauce pan you like) fry the chopped onion for a few minutes with some oil, salt and pepper. Add the leeks and fry for about 5 minutes until the leek softens up. It will also start to smell really nicely - nutty and creamy at the same time. When it's softened a bit add the rice to the pan and stir well. Make sure every single rice grain is coated in the oil and fry for a minute or so. Add the wine and let it boil off stirring the rice constantly. It is best to have the heat on very high when you do that - the wine should boil off quickly for the best taste. Then add a ladle of stock and stir over reduced heat. Keep adding the stock until the rice is ready. You can tell it's done by biting through one piece - it should be all soft except the middle - a harder, small, white core should remain. If you're not sure consult the packet of your rice, but it shouldn't take longer than 20 minutes. Turn the heat off and add a knob of cold butter to the risotto. Stir well and cover with a lid. Let it sit for about 5 minutes before serving.
 
Serve with parmesan and enjoy with a glass of white wine! Perfect comfort food!

Wednesday 26 October 2011

Tuesday 25 October 2011

Sunny days

How to enjoy sunshine, demonstrated by Duende - the Sun Child.

Sunday 16 October 2011

Autumn means chocolate

It's getting colder and colder everyday. The summer has most certainly left us and all we can do now is wait for the world to fall asleep completely in its waiting for spring-time. It is a good thing we have Christmas to look forward to, otherwise falling asleep with the trees and squirrels would be a tempting option. I do however enjoy autumn. I like the colours of the leaves and how they fly in the wind before they settle in the (still) green grass. I also like the light in the early mornings- the buildings and treetops seem to almost shine with a warm, orange glow which is so different to the feel of cold air on your skin as you walk in this pretty light.

None of the other seasons invites comfort food as much as autumn. And nothing makes better comfort food than chocolate, preferably dark chocolate. The recipe below is an attempt to recreate Gü's amazing chocolate soufflés. It works quite well, I think. Especially with a cup of tea and a good book on the side.


Melting chocolate puddings 

120g dark chocolate
100g butter
20ml rum
1/4 cup caster sugar
2 medium eggs
2 egg yolks
dash of vanilla extract
1/4 cup plain flour

Preheat the oven to 160C degrees.
Melt the chocolate, butter and rum over a steam bath stirring occasionally.

While the chocolate is melting whisk together the eggs, egg yolks and sugar together in a big bowl until blended well. Add vanilla essence and and whisk with an electric whisk for about ten minutes until the mixture gets a bit firmer and starts to form little ribbons as you whisk it. I suggest using an electric whisk for ease - it probably takes ages by hand. And if you have one of those magical KitchenAid machines it will take no time at all.

When the chocolate is melted pour it around the edges of the egg mixture. Sift flour on top and begin to fold the mixture. Take your time and do it very slowly so that the air whisked into the eggs doesn't escape. This helps to keep your puddings light and fluffy. The folding will take a long time but it is well worth it. Fold until the mixture is evenly chocolatey in colour.

Grease 4 ramekins with some butter and pour the chocolate mix into the ramekins. Bake for about 12-14 minutes so that the top is firm and crusty but the puddings are still guey inside.

(you can also freeze this dessert, but make sure you add another couple of minutes to the baking time before serving!)

Enjoy. But watch out because the ramekins get very hot. And the puddings are quite addictive.

Friday 23 September 2011

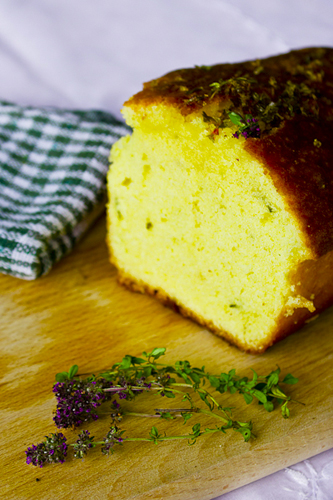
Lemon and thyme loaf

I fell in love with this Hummingbird Bakery recipe (yes, it's yet another one of those) the moment I saw it. I have always liked lemons - my childhood party trick was downing a juice of one lemon without a twitch. And that's probably why I never liked lemon-flavoured food. Lemons should have a kick to them, they should be sour - you should feel them like nothing else when you have them and mixing them with food takes all that away. I expected lemon desserts and cakes to taste just like lemons do and they, obviously, don't and never will. Luckily as I grew, so did my taste-bud tolerance (pretty typical I guess) and I have expanded my lemon horizons. These days when I see the word 'lemon' or 'lime' in a baking recipe, I'm all in. And if you like experimenting there is nothing like mixing some lemon and lemon thyme in a cake. They are a match made in heaven. Thank you, Hummingbird!


Lemon and thyme loaf  
(based on Hummingbird Bakery Cake Days recipe)
Sponge:
190g soft unsalted butter
190g plain flour
Zest of 2 unwaxed lemons
3 tsp chopped lemon thyme leaves
190g caster sugar
3 medium eggs
1 tsp baking powder
25ml soured cream
1/4 tsp salt

Syrup:
80g caster sugar
Zest and juice of 1 large lemon
4 tsp finely chopped lemon thyme leaves

Preheat the oven to 170 C and grease the loaf tin.
Mix the butter, lemon zest, thyme leaves and sugar together until light and fluffy. Add eggs one at a time, each time making sure they mix well before you add the next one. If you have one of those magical freestanding electric mixers I would recommend using it. If not, be prepared to spend a long time mixing but it is well worth it.
In a seperate bowl mix together the flour (sift it!), baking powder and salt. Add them onto the butter and egg mixture in a few batches, each time mixing well before adding some more. Add the soured cream and mix again. Pour the batter into the loaf tin and bake for 40-50 minutes. The  loaf needs to be firm, so use a skewer to see whether any sticks to it when you insert it across the sponge. It should come out clean.

In the meantime make the syrup*. 
Put all the ingredients in a saucepan with about 60ml of water. Bring to boil and simmer until its reduced by about half and then pour the syrup over the cooked loaf as soon as it comes out of the oven. Let the loaf cool completely before serving. Decorate with some thyme sprigs to make it look more interesting. Although it doesn't need it - it will be gone before you have time to appreciate it for its aesthetics. Enjoy!

*the original recipe calls for less sugar and less water. I however found that that didn't make enough syrup for my liking, so I suggest making a bit more if you like your loaves a bit more soggy.

Wednesday 21 September 2011

Monday 19 September 2011

Summer cheesecake

I know it is not strawberry season any more, but I do think this recipe is worthy of a note because it does make an AMAZING cheesecake. It may at first seem that it is going to be a fat/sugar overdose cake but trust me - it all works great together. And it is so good you will quickly forget about all the sugar and cream involved and will ask for another piece. And then another and another.

Also, it is the first time I steam bathed food in the oven. It is fiddly and it is stressful (well, it was for me) but well worth it. I made a beast of a cheesecake and felt like a pro in the kitchen once everything was done.


Strawberries and cream cheesecake 
(original recipe can be found in Hummingbird Bakery Cake Days book)

Base:
220g digestive biscuits
100g unsalted butter, melted

Topping:
200g fresh strawberries, hulled and chopped
(plus a bit more to decorate)
180g caster sugar
600g cream cheese
2 eggs
100g mascarpone
20g icing sugar
100ml double cream

Start with lining your cake tin with some baking paper. In a blender blend together digestives until they are just fine crumbs. Put them in a bowl and pour in the melted butter. Stir until the two ingredients are well mixed together. Put the mixture into the tin and press with the back of a spoon to form the base of the cake. Put in the fridge for half an hour to allow to set.

In the meantime put the strawberries in a saucepan with 80m of sugar and 30ml of water and bring it all to boil. Reduce the heat and cook until the liquid is reduced by half. I expected it to only take a few minutes but actually it took about 10. Watch out not to overcook the strawberries though - you don't want them to fall apart.

Preheat the oven to 160C. Beat together the cream cheese and the remaining sugar until smooth. Add yhe eggs one at a time and mix well. Now add the strawberries to the cheese mixture and stir them gently in.

Take the cake tin out of the fridge and wrap it tightly with cling film or tin foil on the outside - this is to make sure than no water leaks through into you cake whiles we give it a steam bath in the oven. We're steam-bathing it so that the cheesecake is moist and creamy. It also prevents it from cracking which cheesecakes like to do. Once wrapped, tip the cream cheese strawberry mix into the tin and place it on a baking tray (or a roasting tin) filled up with water. The water should be up to about 5mm away from the top of the cake tin.
Bake for about 30 minutes or until the top of the cake is firm but the middle is still wobbly. Allow the cake to set and cool in room temperature and once it's cooled put it in the fridge for at least an hour.

Beat the mascarpone with icing sugar and in a separate bowl mix whip the double cream until it forms soft peaks. Gently mix the two together, folding the cream into the mascarpone mixture. Tip the mascarpone mixture on top of the cheesecake and put it back in the fridge for a couple of hour before serving.

When serving garnish with the remaining strawberries. Enjoy and don't forget to share it with your friends - it will make them happy, I promise!

Tuesday 13 September 2011

Summer baking


Recipes coming soon

Monday 18 July 2011

Lack of inspiration

My mum once made this pie when she "lacked inspiration". I wish food like that came out of my struggles for culinary creativity. I can't claim this recipe but I can still enjoy it and spread the word about it. It's a perfect meal to serve your guests in the summer - it's quick, easy and a bit more exciting than a standard, boring pasta which is the first thing you think of when you lack inspiration.


Olives and Feta Pie

1 onion, chopped finely
200g feta, crumbled into medium size pieces
150g pitted, black olives, chopped in half (and drained)
400g chopped, tin tomatoes*
rosemary, thyme **, salt and pepper
some cherry tomatoes, halved

500g puff pastry
(and a 18cm diameter pie dish, greased)
some milk or egg yolk to glaze the pastry

Pre-heat the oven to 180 degrees
Roll out the pastry and put it in the pie dish. Pierce it with a fork a few times to help the air get out (the pastry will not puff uncontrollably). Bake for about 10 minutes and then put aside to cool.

In the meantime fry the onion in a sauce pan with the herbs, salt and pepper. Add tomatoes, bring to boil and let it simmer until it thickens a bit - it should take about 10-15 minutes. When it's done add the feta and the olives and stir well. You can add some halved cherry tomatoes to the sauce at this stage. Pour the sauce onto the pastry and fold the sides on top of the pie. Glaze it with a brush soaked in some milk or egg yolk. Bake for 15-20 minutes until the pastry is golden brown.

(* I used dry herbs but the pie is even nicer with fresh ones. If you feel like making it a bit more italian you can also add some basil)


Saturday 16 July 2011

Chard and what to do with it

I had, until recently, never cooked with chard. But then again this entire blog should be called "My first ... (insert the name of the dish here)" and it's the case this time, too. Chard soup in its many varieties is a dish that will always remind me of Polish summers in the countryside. There are recipes for chard soup served hot for rainy days
and cold - as a refreshment on lazy, sunny day - a bit like Spanish gazpacho. Either way - don't be put off by chard - it may look and taste a bit like lettuce before you cook it, but it does make a great soup, especially when cooked with beetroot. Just the colour itself is fantastic.


Polish Chard and Beetroot Soup

1/2 L stock
medium sized bunch of chard, rinsed well
2 carrots, chopped into small cubes
2 small beetroots, chopped into small cubes.
1/2 glass of water
1 Tbs plain flour
4 Tbs single cream
juice from half a lemon
salt and pepper
hard boiled egg/some potatoes/cottage cheese/chives (optional)

Soak the chard in hot stock for a few minutes and then take it out to cool it down. Keep the stock. Chop the beetroot and the carrot and add them to the stock. Cook until both become soft. In the meantime when the chard is not too hot to touch chop it roughly into thin and long pieces.
Add 1 tablespoon of flour to half a glass of water and add the cream to it. Mix well, so that there are no lumps in the flour. Add the cream mix to the stock and let it boil for a few minutes. Add the chard and squeeze into the lemon juice into the soup. Season to taste.

You can serve the soup with some hard boled egg, potatoes or a lump of cottage cheese in the middle. It also looks very nice served with some chives.

Enjoy!

Friday 8 July 2011

Slut's Spaghetti

You can't really go wrong with a dish called Slut's Spaghetti, right? Especially if you when its taste is the perfect combination of the fiery chilli and tangy capers. Plus - all the ingredients in it come from a tin, so when it's raining outside (just like today) you don't even need to go out to enjoy it. Yet again - thank you Italy!


Spaghetti alla puttanesca 
(based on Nigella's recipe)

6 anchovy fillets, drained and finely chopped
3 garlic cloves, peeled and finely sliced, crushed or grated
1/2 fresh red chilli (or to taste), finely chopped
1 tin chopped tomatoes
150 g pitted black olives, chopped a bit
2 tsp capers
olive oil
salt, pepper
spaghetti for two
some chopped fresh parsley, to serve (optional)

Cook the spaghetti al dente. You can do in whilst the pasta sauce is already cooking. Reserve 2 tablespoons of water with the pasta when draining.

Fry the anchovies in the frying pan for a few minutes and when they are soft and 'almost melted' add garlic and chilli and fry for another minute. Add the tin tomatoes, olives and capers and boil the sauce down. It should take about 10 minutes until it's all nice and thick but still saucy. Season with salt and pepper to taste.

Add the pasta (with the remaining water) to the sauce and mix well. Serve with some fresh parsley.
Enjoy!

Tuesday 5 July 2011

Wild strawberries, raspberries and cherries (it's summer!)


I went home last week for a few days. Home in the summer means the Polish countryside with its forests and meadows and lots and lots of walks through them. At this time of the year you could easily survive on eating only the stuff that grows in our garden and orchard. We had so many strawberries I could not look at them after a few days and the abundance of cherries would give even the most avid of cherry-eaters a slight headache (followed by a bellyache). Berries of all kinds pop up and mum and gran can’t keep up with the jam-making to get rid of all the fruit. We also hosted a birthday party and after flicking through tons of cookbooks we have decided to go for a seasonal cake – to take advantage of the fruit and the hot weather.

This cake has summer fruit and ice cream (lots of it!) and to make it even more wonderful it is a meringue-based cake. Can you get any better?  It is a bit of a labour-intensive recipe because it requires a lot trips to and fro the freezer. Other than that however – it is a very simple dessert. If you want to make it super-fancy you can make your own ice-cream and your own meringue. We opted for the basic version which only really requires assembling all the bits together.


Summer Cake

2 ready-made meringue bases
250g yoghurt and berries ice cream (or any ice cream of your choice)
200 g double cream
A medium bowl of summer fruit such as strawberries, redcurrants, sweet cherries, wild strawberries and raspberries.
Mint to decorate

Put one meringue base at the bottom of a loose-bottom cake tin. Mix well the ice cream with about 50g of double cream and spread it on the meringue. Place some of the summer fruit on the ice cream base (not too much as you don’t want a layer of fruit here – just an occasional strawberry in the cake). Put the cake tin in the freezer. Beat the remaining cream. Put about 5 tablespoons of it aside (you will need it for the topping). Add some of the fruit to the cream and spoon it onto the ice layer of the cake. Put the other meringue base on top and put the cake tin in the freezer again. Leave for at least an hour in the freezer until the cake sets completely. Before serving remove the cake from the tin. Spoon the remaining cream on top of the meringue and put all of the remaining fruit on top of the cake. Decorate with mint.
Store in the freezer (although this is also good half-melted!)

Enjoy!

Saturday 2 July 2011

Country Life

... or where I go when I run away to Poland in the summer.


More to follow.

Thursday 9 June 2011

Rigatoni ti amo!

I have never been a great fan of penne. There is just something really disappointing about it whenever I have it. Or maybe it's just that it is the most popular of pasta shapes and because of that it doesn't feel that exciting. Rigatoni on the other hand is a whole different story. I could have rigatoni every time I have pasta and I wouldn't regret it. Especially if they were my Mum's new favourite - Rigatoni con Balsamico! I am not sure where the recipe comes from originally, I got it from my Mum some time ago and I know she has introduced some minor changes, so here it is:


Rigatoni con Balsamico
enough rigatoni for two
1 Tbs + 75g unsalted butter
2 garlic cloves, chopped
1 tin chopped tomatoes
2 tsp balsamic vinegar
7-8 leaves fresh basil, chopped
salt, pepper and pecorino (I had parmesan and it worked)

Melt 1 Tsb of  butter in the pan and add the garlic. Fry for a minute until the garlic softens a bit and then add chopped tomatoes. Season with salt and pepper and add basil. Reduce heat and boil of the sauce until it resembles a light syrup.
Boil the rigatoni according to the instructions on the packet. When it's ready get rid of the water and add 75 g of butter to it and stir well until the butter melts. Mix the sauce with the pasta. Add 2 tsp of balsamic vinegar at the end and stir well. Serve with some grated cheese on top. Enjoy!

Note that there is NO oil in this recipe. The butter seems to make all the difference and I'm constantly surprised with how much of a difference it makes. Yum!

Wednesday 8 June 2011

Wednesday 1 June 2011

Potato Salad

I'm back to having a camera. I've also just started research for my dissertation. These two facts of my life don't mix too well. Especially if you consider that the more academic work I do the more I time I tend to spend thinking about food. Last week I got a package with the shiny new piece of technology and then the veg-box came containing new potatoes. Bye-bye dissertation, hello potato salad!


New Potato Salad

1/2 kg of new potatoes (washed but not peeled)
1/2 red onion
about 15 mini gherkins
3 Tbs mayonnaise
1 Tbs yoghurt
1 1/2 tsp English mustard
2 tsp gherkin brine
olive oil
fresh rosemary, salt and pepper

Boil the new potatoes until ready to eat. Drain them and put them aside to cool completely and then put them in your salad bowl. Chop the onion into small cubes and slice the gherkins in halves (or smaller if you wish). Chop the fresh rosemary. Add everything to the potatoes.
In a separate bowl mix mayo with yoghurt, mustard and gherkin brine (to taste). Add some olive oil and mix well until all ingredients blend together. Season with some salt and pepper and then pour into the salad. Mix well and enjoy.

(the amounts are estimates as I didn't really pay that much attention to them - if you think it needs to be more saucy make more of the dressing)

Sunday 29 May 2011

Wednesday 25 May 2011

Puppies!


Bernese Mountain Dog puppies at Tickbern kennel. Bred by Jim Cooke.

Monday 23 May 2011

Lemon and Mascarpone Tartlets

It was Charlie's birthday last week and he didn't want a cake (well, he did but he wanted it for the party later in the week). I personally believe you can't have a birthday without a cake. So I made lemon and mascarpone tartlets and served them after dinner with a raspberry-champagne sauce. Perfect sunny-day birthday treat.

Lemon and Mascarpone Tartlets (based on Simon Rimmer's recipe)

You will need:
3 small tartlet baking dishes

1 sheet of sweet shortcrust pastry
150 g  mascarpone
1 cup caster sugar
2 lemons, juice and zest
2 eggs

For the sauce
1 cup caster sugar
1/2 cup of prosecco/cava/champagne (I used prosecco)
1 cup fresh raspberries

Preheat the oven to 180C. Bake the pastry blind for about ten minutes and let it cool while you make the lemon filling.

Beat the mascarpone, caster sugar, lemon juice and zest together in a bowl until very smooth. Beat in the eggs until well combined. Pour the mixture into the tartlet dishes and bake in the oven for about 20-25 minutes or until set. Remove from the oven and cool. Once they are cool put the tartlets in the fridge, as they are best served cold.
For the sauce, bring the sugar and champagne to the boil in a saucepan, then reduce the heat and simmer for 10 minutes. Remove from the heat, then add the raspberries and set aside to cool completely. When it cools blend the raspberries with champagne in a blender until smooth, then pass through a sieve.
Serve the tartlets with the sauce on top (and a candle if they are a birthday present).

Thursday 19 May 2011

I haven't got a camera at the moment and it makes me a bit sad. I do have a pile of film to develop though and that makes me a bit happier. Just like risottos - they make me happier too.

Risotto with home-made pesto and courgettes. Yum.